
Today I’d like to introduce Larry. Say “Hi” kids. Hi, Larry! Swell.
So Larry’s a retired engineer. (No, not the train kind.) If you’ve ever known an engineer, you know that means Larry can be very methodical about things. It also means he doesn’t like having to do the same thing over and over if he can help it. He’s a fan of automation.
Where this becomes important to us is that one of the things Larry automated was telling people how he makes four loaves of sourdough bread each week. His process has been refined over more than a year of practice, and his directions are thorough. It probably takes less time to actually do most of these steps than to read about them.
Just how long are his instructions? I had to split them up over four posts, that’s how long. So without further ado, here’s Part 1 of Larry’s Sourdough Bread Method.
How I make 4 medium size Sourdough Loaves
Part I
Part II
- Wake up the wee yeast beasties
- The Sour in Sourdough
- Flour Power
- Be Honest but Autolyse
Part III
- Make it Slick
- The Need to Knead
- The Rise of The Wee Yeasties
- And Batch for Hungry Friends
Part IV
- Into the Loaf Pans
- The Last Rise Before The Heat is On
- How Cool is This
The Introduction
I like to cook and I like gadgets. So when I retired I found myself long on time and shorter on budget. I was paying between $3 and $4 for a loaf of good bread at the store. One day the light went on.
I started making bread, first two loaves at a time. Then I got a good starter and tried sourdough — which I found easier, or perhaps I was just more experienced.
[Editor’s note: “Starter” is a live culture, different from regular yeast. You can start your own by leaving yeast out for a couple of days — you can see how I made my own sourdough starter. Or you can order a sourdough starter from King Arthur. They also have great directions on care and feeding of your sourdough starter. Good information whether you buy it from them or not.]
Now I make one or two four-loaf batches a week, and I give away plenty to grateful friends. Occasionally I’ll make jalapeño-cheese sourdough, which is to kill for when toasted on a barbecue grill.
I’ve been baking bread for over a year. I have the most inexpensive Kitchenaid stand mixer, and so far have resisted the impulse to upgrade. The bread costs me about 65¢ a loaf, a large part being electricity for the oven, my hometown City-owned electric utility having the country’s highest rates. A double sourdough batch of four loaves will use less than 5 pounds of flour including feeding the sourdough starter.
Some friends have politely inquired how I bake the bread, so I put this little How-To together. I don’t feel especially like I am a great baker, but have found this process reliable in making truly tasty sourdough loaves. I prefer loaves to the standard marketed sourdough, and apparently so do other people.
Sourdough is only flour, water, a little salt and starter. The starter is flour, yeast and lactobacilli. The small amount of sugar used is consumed by the yeast. The salt moderates the yeast during rising. No fats or oils except coatings to keep the dough from sticking to utensils. Sourdough keeps better than standard commercial offerings, so I don’t need any “bread improvers”, “enhancers” or “preservatives”.
I usually bake in the morning, and by noon the loaves are cooling on racks. [Editor’s note: Read that again: “I usually bake in the morning, and by noon the loaves are cooling on racks.” This is one of the untold stories of baking your own bread. If you make a habit of it, you get really good at it, really fast.] The work involved doesn’t take up the entire time.
I have included many pictures and descriptions of extra steps. I did this so anyone trying this recipe and How-To would possibly avoid a big feeling of “What do I do now?” in the middle of baking. I suspect a lot of people will find this is more than necessary. However with all my good intentions, you are on your own. I offer only the description of the method that I use with great results, and nothing else.
The Overview
The overall process goes like this:
Prepare the starter the night before.
Measure, mix, autolyse, knead, form and into the proofing box with batch one.
While doing the above, grease bowls, loaf pans and wax paper covers; prepare kneading board and measure for batch two.
After batch one goes into proofing box for 1st rise, mix, autolyse, knead, form and into the proofing box with batch two.
This all take about an hour to 1½ hours, and the 1st rise is 1½ hours so now there’s a break. Batch two should be ready to bake 15 to 30 minutes after batch one begins cooling.
When batch one has doubled, it’s punched down, formed and placed into loaf pans — about 10 minutes — and into proofing box for 2nd rise of an hour.
Turn on oven in time for temperature to stabilize at 425°F. (220°C., Gas Mark 7), a ½ hour for my oven. Add bowl with water.
When batch two has doubled, it’s punched down, formed and placed into loaf pans — about 10 minutes — and into proofing box for 2nd rise taking about an hour.
When batch one’s 2nd rise is through, slice, mist and put in oven for thirty minutes, when done, remove from pans onto cooling racks. Should be cool in about 1½ hours. Repeat for batch two.
If I start early in the morning, the bread is cooling on racks by noon.
If you’ve not made bread often, skip the second batch the first few tries. It can be surprisingly easy to get out of step with two batches if you’re just starting out.
The Ingredients and The Utensils
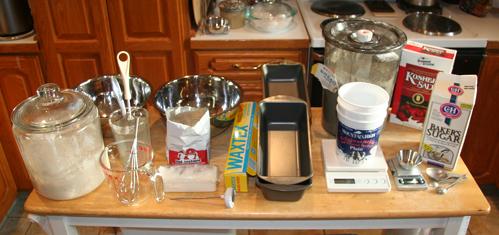
I keep the starter in a gallon counter jar. I have two, which get alternated — the clean one gets the reserved starter and goes back in the refrigerator, and the one in the picture which is fed and ready to go. A smaller one would work but I have big hands.
In the glass next to the starter are a large scoop spoon and a whisk. Kept in the glass jar with water, a drop or two of detergent and some washing soda, they can be rinsed off an used as the bread is made. These are useful in dealing with the sticky starter.
In front is a two-cup Pyrex measuring cup with a small wire whisk, used for regular baking yeast, I use SAF in a one pound bag — shown next to the cup. I buy Crisco® “shortening” to grease proofing bowls, loaf pans and wax paper. [Editor’s note: Crisco isn’t food. I prefer lard for this.] Wax paper covers the bread dough while proofing.
In front is a digital thermometer, very useful. In the back are the two proofing bowls, I use cheap stainless steel ones.
Next come the four “Medium” loaf pans. The ones I like are 7″ by 3″ inches at the bottom, and 2¾” deep. They are 8½” by 4¼” at the top.
Important to me are digital scales. Measure by weight ensures consistency. The larger one is used for flour, and the smaller one is used for yeast, salt and sugar. The large salvaged yogurt containers are for flour, the small stainless steel cup for sugar, yeast and salt. I find separating measuring and mixing makes it easier to not omit or double something.
I use baker’s sugar and Kosher salt for purity reasons, no surprises.
For flour I use high gluten bread flour. All purpose works also, but I prefer the strength and texture high gluten provides especially for sandwiches. I get a 25 lb bag for less than $11 from Smart & Final. [Editor’s note: If you’re in the Cleveland area, you can find all kinds of flour in 25 lb bags at the Minneapolis Flour Company on Park Ave., near 59th and Harvard. Call ahead.]
Not shown is the Kitchenaid stand mixer. Also a large polypropylene cutting board, a dough cutter, a spatula/scraper from Cuisinart® food processor, a small spray-mist bottle filled with water, an (optional) cooking stone in the oven, a small stainless-steel bowl about coffee-filter size with coffee-filter papers, two larger baking pans that conveniently hold two loaf pans, some baker’s racks for cooling, and a very sharp knife.
Also not shown is my proofing box. I use an old refrigerator (also used for fermentation of home brewed ales), one heating thermostat and one cooling thermostat, and a heating pad. Ideal results come from a proofing box temperature of 85°F. (29°C.) This temperature lets both yeast and lactobacilli work together for that wonderful sourdough flavor. [Editor’s note: If you don’t have a spare fridge sitting around, you can usually proof dough in your oven, turned off but with the light on. This won’t work if you’re trying to do two batches like Larry is describing here. For that, you’re going to have to come up with something.]
Sourdough starter and sourdough can be very sticky, and tricky to clean. The best I’ve found for this is a plastic scrubbing pad. They won’t rust, they don’t change the interior surface of the stand mixer bowl which determines kneading properties, and they can be impaled on on of the rubber coated dividers in the dishwasher for cleaning.
The night before, I fetch the starter from the refrigerator, divide into two parts. The first part is fed and set out overnight, then returned to the refrigerator the next morning. The second is fed with enough flour and water to assure at least one cup of starter for each batch, then it goes into the 85°F. (29°C.) proofing box overnight.
Key Idea: The quality of sourdough flavor depends entirely on the yeast and lactobacillus. The steps shown here are to develop these wee beasties into an “A” team, and are important in determining a successful outcome.


