For special deals and more great content, sign up for the free How To Cook Like Your Grandmother Newsletter.
Email address:


Also receive blog posts via email

Name: (optional)

Not now, thanks

Larry’s Sourdough Bread Method — Part IV

If you haven’t seen it, you should start with Part I of this four-part series.

How I make 4 medium size Sourdough Loaves

Part I

  • The Introduction
  • The Overview
  • The Ingredients and The Utensils

Part II

  • Wake up the wee yeast beasties
  • The Sour in Sourdough
  • Flour Power
  • Be Honest but Autolyse

Part III

  • Make it Slick
  • The Need to Knead
  • The Rise of The Wee Yeasties
  • A 2nd Batch for Hungry Friends

Part IV

Into the Loaf Pans

After 1½ hours, maybe a few minutes more, the first batch will be doubled. Remove the wax paper cover and save it, we’ll need it later. Note: if you drop the proofing bowl sharply on the kneading board, it will slowly collapse in an entertaining way. The gas released is CO2, but not enough to contribute in any significant way to global warming climate change.

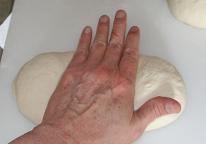
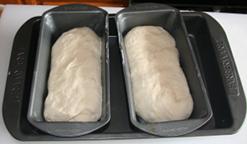
Roll out the risen and perhaps collapsed dough out on the kneading board. Form it into a ball as before, then gently roll it into a loaf shape to cut it into two parts.

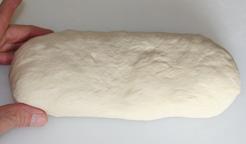
Form into two balls, then gently roll it into two loaf shapes.

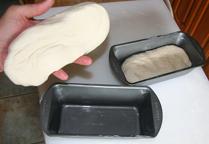
Place the formed loaves into the bread pans. Cover with the waxed paper.

Cover with the saved wax paper and back to the proofing box. I use a larger pan to hold the loaf pans for convenience.

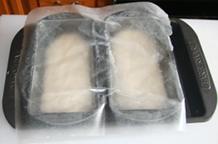
The Last Rise Before The Heat is On

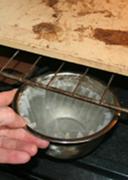
The final rise will be about an hour. In time for the oven to be hot and ready, it should be set to 425°F. (220°C., Gas Mark 7) and a water bowl put in to maintain moisture. I use a coffee filter to increase the moisture from evaporation, I’ll use two if more moisture is needed. Warning: always make sure there’s water in the bowl or you may bake smoked sourdough! ☹ (On the bottom of the oven are unglazed tiles. They help stabilize the temperature.)

When the dough if finished rising, remove (and discard) the wax paper and place the loaf pans in the sink.

Spray lightly with pure water and then with a very sharp and wet knife, slash gashes in the top so the crust won’t tear while baking in the oven. [Note: You have to make this slash in a single quick, sure stroke. If you're timid, or take your time, you'll deflate the dough.]

Then into the hot oven for 30 minutes. I put them directly on the baking stone, but it’s not necessary to do so.

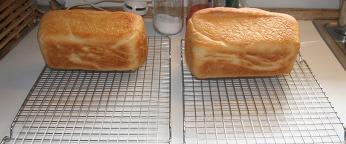
The house will fill with the odor of freshly baked bread. This has been reported to rise from slumber a male teenager before noon on Saturday. When done remove from oven and place then on the cooling racks.

How Cool is This

Immediately turn out from loaf pans and place on side to cool. They will actually cook a little longer, so resist the urge to slice them immediately. And then there were four.

Enjoy.

The end.

That’s it for Larry’s Sourdough Bread Method. If you ask nice, I’m sure Larry will share the recipe for the jalapeño-cheese variation he mentioned in Part I. In the meantime, his recommendation for more information on bread baking is: Adventures in Sourdough Cooking & Baking ©1977 ©1971 by Charles D Wilford.


Want more like this? For more recipes like this, that you can hold right in your hands, and write on, take notes, tear pages out if you want (Gosh, you're tough on books, aren't you?) you might be interested in How To Cook Like Your Grandmother, 2nd edition, Illustrated. Or to learn your way around the kitchen, check out Starting From Scratch: The Owner's Manual for Your Kitchen.

This entry was posted in Bread and tagged . Bookmark the permalink. Post a comment or leave a trackback: Trackback URL.

6 Comments

  1. Fachtna Midwest
    Posted November 13, 2009 at 7:46 pm | Permalink

    So, let's say you want to make loaves to give as gifts for Christmas. About how long is a loaf good for? A couple days? A week?

  2. Posted November 14, 2009 at 7:29 am | Permalink

    I'll ask Larry to chime in with details about this particular recipe, but I've got a tip I've used for sourdough in the past. (Keep in mind this has always been with the typical rounded loaf, like French bread, not the pan-shaped that Larry is showing.)

    Once the loaf is completely cool, wrap it tightly in plastic wrap. You want all the air out. Then wrap that in aluminum foil, and freeze it. I've kept loaves like this for over a month.

    When you're ready to eat it, unwrap it and set it on a wire rack to defrost. Or, unwrap and discard the plastic, then re-wrap in foil and put in a 250° oven for 20-30 minutes, until it's warm all the way through. It comes out smelling like fresh-baked.

  3. Keep_It_Simple_Engineer
    Posted November 14, 2009 at 12:00 pm | Permalink

    Hi Fachtna Midwest…

    I really don't know about keeping these loaves. I bake for my own use, and I bake at least once a week, so I'd guess at best a week. Since I'm retired, I bake when I run out. I started baking the second pair of loaves to give to friends.

    Because of the lactic acid in sour-dough, it will keep longer than non-sour-dough made without preservatives.

    However, with any bread (possibly except fruit cake) the closer it's consumed to the time it was baked, the better it will be.

    I buy Bakery & Food Service low-density clear poly bags (5.5×4.75×15) to use for the finished loaves. They are also pretty cool for breading when frying chicken pieces.

    Hope this helped!

    Larry the simple engineer

  4. online cooking classes
    Posted November 17, 2009 at 12:20 am | Permalink

    I think loaves can last for a week so you don't have to worry if you are going to give the loaves as presents.

  5. Amy
    Posted January 1, 2010 at 7:52 pm | Permalink

    It doesn’t say how long to cook the bread! I am in the middle of it right now so no turning back. I set the timer for 30 minutes and will check it…I guess I’ll take it out when it looks like the picture here.

    • Keep_It_Simple_Engi
      Posted January 3, 2010 at 11:36 am | Permalink

      Amy…

      You’re right, thirty minutes is the time in the oven!

      Larry, the KeepItSimpleEngineer…

» Subscribe to comments on this post

Post a Comment

Your email is never published nor shared. Required fields are marked *

*
*

You may use these HTML tags and attributes: <a href="" title=""> <abbr title=""> <acronym title=""> <b> <blockquote cite=""> <cite> <code> <del datetime=""> <em> <i> <q cite=""> <strike> <strong>

  • Free Online Class

    Sign up now for my free 10-day online course in the basics: Starting From Scratch

  • Buy the Book


    Cooking used to be all about making food that tasted good. But somewhere along the way, we seem to have decided the diet-of-the-week was more important. How to Cook Like Your Grandmother is a return to recipes and techniques that are based on what tastes good, not on junk science and fad diets. You won't find the words lite, low, lean, free or skim anywhere. This is all real food, cooked the way Grandma would have done it.
  • Buy the Other Book


    People have been making and eating food as long as there have been people. And food. But somehow we've let ourselves believe that it's something only experts can do "right". That's where Starting From Scratch comes in. I'm not saying you'll go from zero to hero just by reading it, but at least now you'll know what those self-proclaimed experts are talking about.
  • Follow this blog

     Subscribe in a reader

    -- OR --
    To get recipes in your email
    Enter your email address:
    -- OR --
    Sign up for the weekly newsletter. Email address:
  • All-time Favorites

    Perfect Brownies French Onion Soup Bruschetta Pizza Egg Salad Onion Rings Banana Cake Cheesesteak Peach Cobbler Frozen Chocolate Truffle Pie Emily's Creamy Cheesecake
  • No Awards Please

Page optimized by WP Minify WordPress Plugin