
If you haven’t seen it, you should start with Part I of this four-part series.
How I make 4 medium size Sourdough Loaves
Part I
- The Introduction
- The Overview
- The Ingredients and The Utensils
Part II
Part III
- Make it Slick
- The Need to Knead
- The Rise of The Wee Yeasties
- A 2nd Batch for Hungry Friends
Part IV
- Into the Loaf Pans
- The Last Rise Before The Heat is On
- How Cool is This
Wake up the wee yeast beasties
First thing in the morning… 8.6 grams of yeast. This is baker’s instant yeast, 8.6 grams is the equivalent of three packets, although I use bulk yeast which is more economical. These wee yeasties are the tried and true professionals. I add hot and cold water to get to the proper temperature, 95°F (35°C.), 1½ cups worth. Stir with small whisk to fully dissolve yeast. (The camera is in my right hand.)


Measure a tablespoon of sugar and add it to the yeast, stir well.


Now let the wee yeasties wake up and smell the carbohydrates, while we prepare the mixer and starter.

Proper love and care for the wee yeasties means keep them warm and let them be happy with their surroundings. I heat the stand mixer bowl by running hot water over it.
2nd batch note: If you’re working on the second batch, the stand mixer bowl would be in the sink filled with hot water. Just take a plastic scrub and get large pieces out of the bowl and off the dough hook. The resulting gooey plastic scrub will go in the dishwasher where it will be cleaned to near pristine.
The Sour in Sourdough
 Here are the happy starter wee yeasties hanging out with their good buddies lactobacilli. Starter wee yeasties have developed a symbiotic relationship with the lactobacilli. This partnership prevents wild child yeasties and other obnoxious wee beasties from joining the colony. We’re going to introduce these guys to the tried and true wee yeasties known as baker’s yeast.
[Editor’s note: I can’t help but hear that last paragraph in a Scottish brogue. I’m almost expecting a leprechaun to pop out from somewhere.]
Sourdough purists reject the idea of using baker’s yeasts, stating that true sourdough is superior to this “new-fangled” hybrid of traditional starter and commercial baker’s yeast. I don’t disagree with them.
But I don’t have several days for traditional sourdough proofing. For me the hybrid is a fine if not pure solution. I don’t bake well enough for competitions, but I have a happy mouth and friends who call themselves lucky.
Stir up and scoop out some starter. Drop it into the warm stand mixer bowl till you get about a cup.


Next here come the professional wee yeasties. Stir well before pouring and mix gently and well after.


Now put the stand mixer bowl on the stand mixer. (I use a terry towel around the bowl to keep it from chilling.) While measuring flour I run the mixer with the dough-hook to get in oxygen for the yeasties. It’s like Vitamin C to the little beasties.


Flour Power
For flour I measure out two cups (from recipe) which is 254 grams (by weight) into each of two yogurt containers, for a total of four cups. Then these are added to the starter mixture in the stand mixer. Run the stand mixer on low (#1) until the flour and starter mix are evenly mixed.

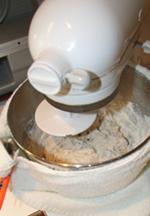
Now we are going to give everybody 10 minutes to get to know each other and let the mixture absorb the water in the dough. After this everybody will be raring to go. I cover the mixer for warmth and privacy (after all there’s reproduction going on).


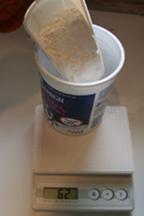
While the introductions proceed, I measure out the last cup of the flour and the salt into a third yogurt cup. They can be mixed in the yogurt container. 13.1 grams of salt and one cup flour (126 grams). Salt will simmer down the rambunctious yeasts for appropriate behavior during proofing. This will be added after the introductions are done.


After the ten minute introductions, add in the cup of flour/salt, then mix as before, and cover again for 20 minutes.


Be Honest but Autolyse
The dough will now began a process called autolyzing. [autolysis: a hydration rest between the mixing and kneading of the dough that allows the gluten in the dough to rest and simplifies the shaping process of the finished dough] A lot of kneading problems go away because of autolyzing, and the final bread produced is also better.
Key Idea: The success of the bread’s texture (called “crumb”) and rise (called “spring”) are dependent upon gluten development and kneading. Autolyzing is important for these and a good outcome with bread.


