For special deals and more great content, sign up for the free How To Cook Like Your Grandmother Newsletter.
Email address:


Also receive blog posts via email

Name: (optional)

Not now, thanks
Drew Kime

How To Make Rotisserie Chicken

I bought myself a new toy for my birthday. A rotisserie attachment for my grill. The main thing I wanted it for is to do a standing rib roast this coming Christmas. Yup, I’ll be huddling in the garage, with the grill set up in the doorway. Hopefully it’ll be snowing, that would make for some great pictures.

But just to break it in, I did a chicken. I’ve had the rotisserie chickens you can buy at the grocery store, and they’re actually pretty good. But of course I think I can do better. Cockiness, confidence or delusion, you be the judge.

Ingredients


one whole chicken, 3-5 pounds
kosher salt
fresh ground black pepper

Directions

Apparently some people treat rotisserie chicken as seriously as some other people treat ribs and chili. They’ve got their own secret rub, all kinds of techniques, massive preparation. Seems a bit overkill to me.

I know that as long as the skin is crispy and has some salt and pepper, and the inside is still moist, it’s going to be good. So I intentionally went with the easiest possible way to make this. If I end up needing to do more, that’s fine. But I didn’t want to start out with some elaborate preparation and spend the next 40 years wasting my time with stuff that just doesn’t matter.

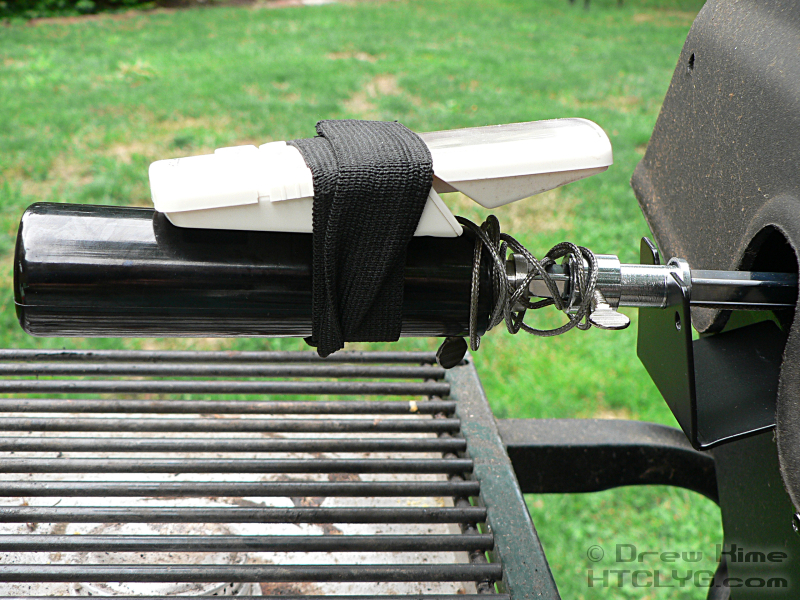
That’s why there’s only three ingredients listed above. Nope, not even any oil or butter on the bird before it goes on the spit. But what I did do was wire up the spit with the probe for my digital thermometer. This was a test run for when I do the rib roast, so I wanted to see if it would work.

First step was to run the probe through the collar that rests in the support, and make sure the spit still fits through the collar.

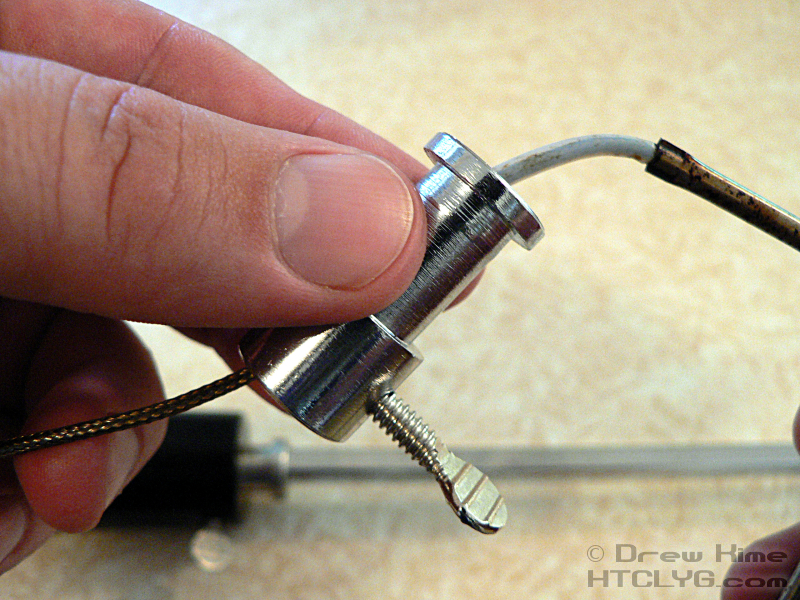
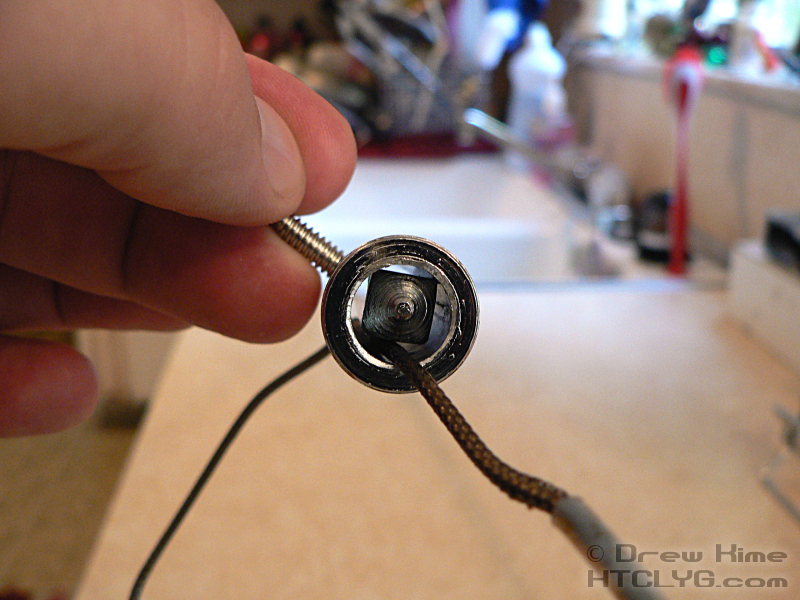
So far so good. And as you can see in the ingredients picture above, I also ran it through the fork that was going to go at the neck end of the chicken.

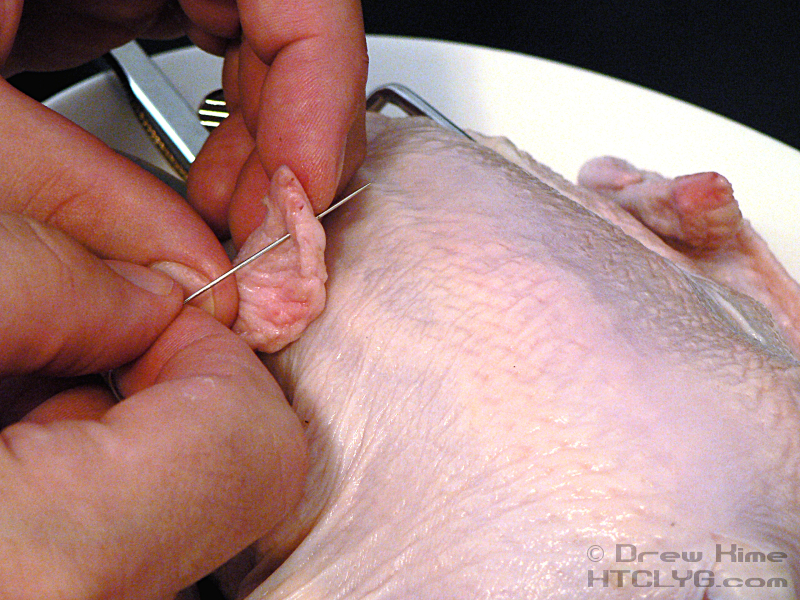
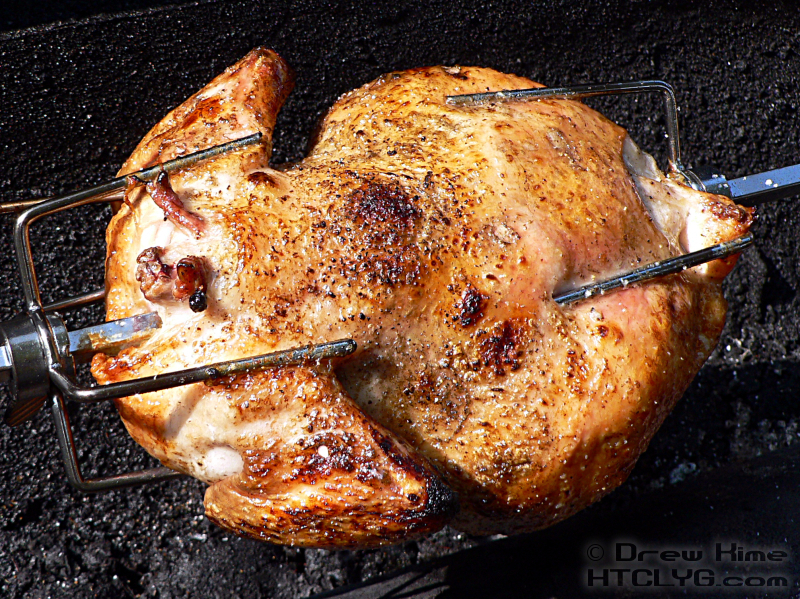
Next was to tie up the wings and legs so they don’t hang down into the flames. I forgot to get the butcher’s twine, so I figured I could stitch it up with heavy-duty thread, just like I do with the thanksgiving turkey. Hook the wingtips together across the breast …

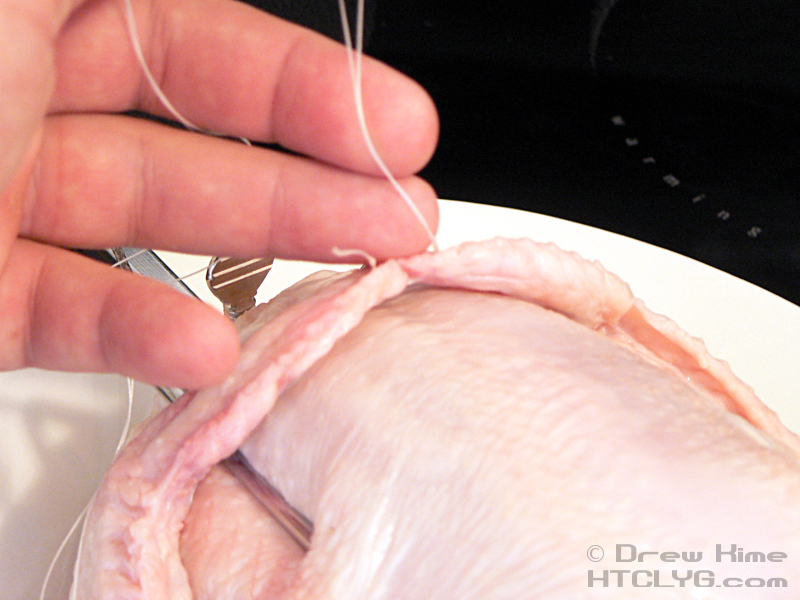
… then hook the ends of the legs together. I was also able to tuck these into the forks on my spit.

Once the forks were in place and the chicken wasn’t going anywhere, I tucked the probe in behind the wing, and inserted the tip in the thigh, since that’s the part that needs to come to the highest temperature.

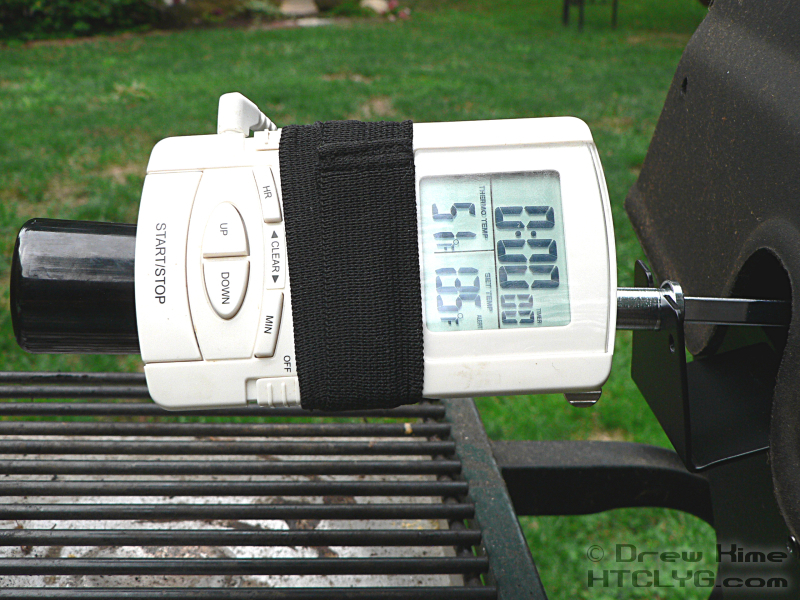
Now, with the wire running through the collar, I strapped the display part of the thermometer to the handle of the spit and set it for 135° so I’d have a bit of warning that it was nearly done.

As it rotated, I gave a good coating of salt and pepper all the way around.

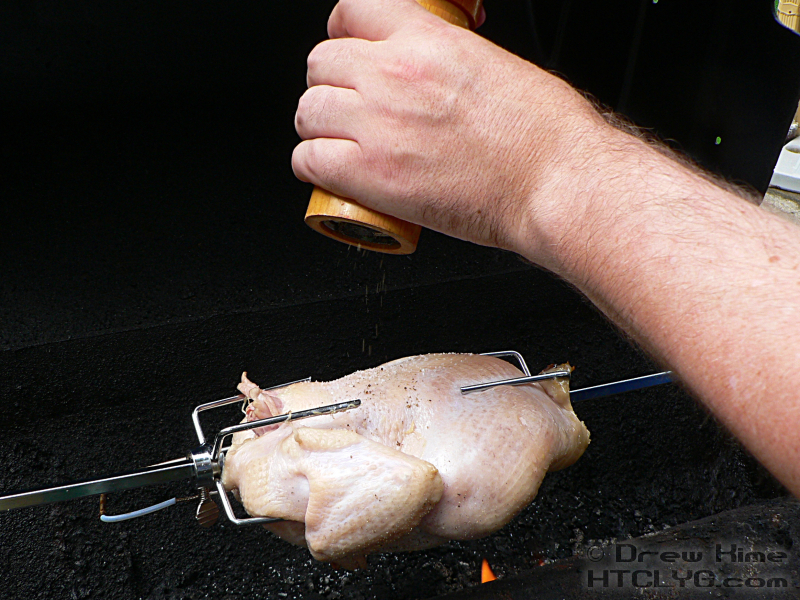
If I had oiled the bird, I could have seasoned it before even putting it over the flame. As it was, I had to wait until it had gone around for a couple of minutes and the fat was starting to melt out. Once the self-basting started, the salt and pepper stuck just fine.

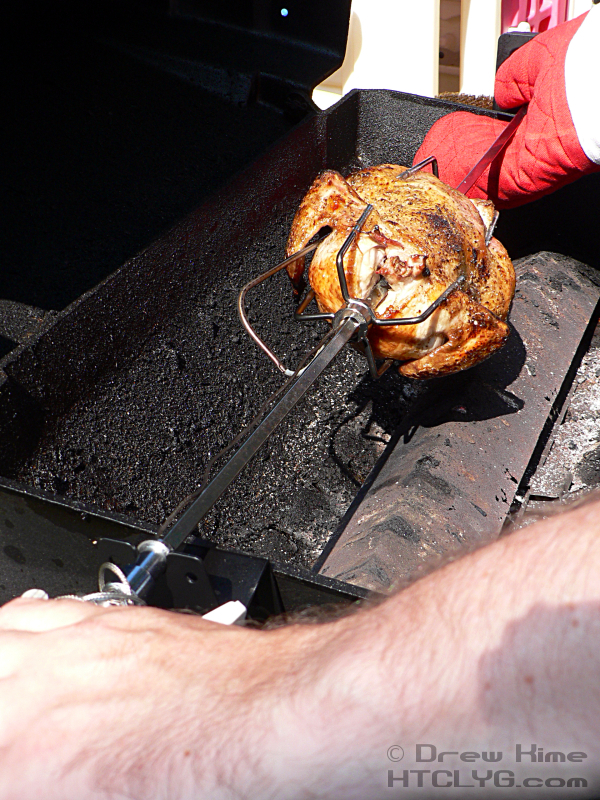
This was a pretty small bird, only 3-1/2 pounds, and I had the flame set a bit high. I just got a new propane tank, and even with the knobs turned all the way down it was pretty high. I had to turn down the valve on the tank to get the flame to stop reaching all the way up to the bird. Between the size of the bird and the too-high flame, the thermometer was already beeping when I went to check after about 40 minutes.

I was expecting an hour or more, but it looked good all the way around and the thermometer showed 165°. Okay, good enough for me.

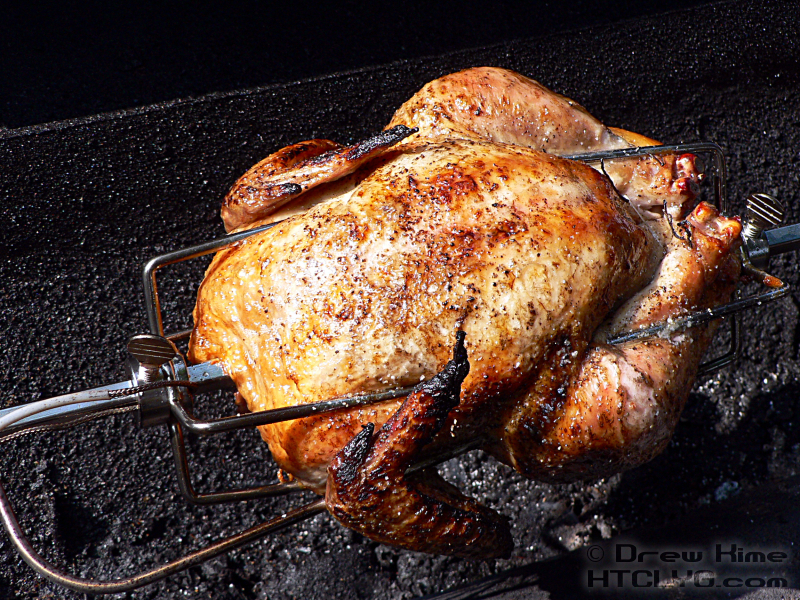
You can see that the thread on the wing-tips had burned off. Oops. Luckily they stayed pretty much in place, and it was only the very tips of the wings that burned. And the flare-ups were getting to be pretty steady, so I was afraid it would burn if I left it on much longer.

I was able to hold this up just from the handle, but I didn’t want to take a chance dropping it so I used the heavy-duty mitt to grab the other end of the spit.

I lifted the spit off straight up, but as I was walking toward the house I tilted it a little bit. About a cup of juice ran out of the cavity. Man, I wish I had captured that for gravy. Next time.

Let it rest for 10-15 minutes before carving.

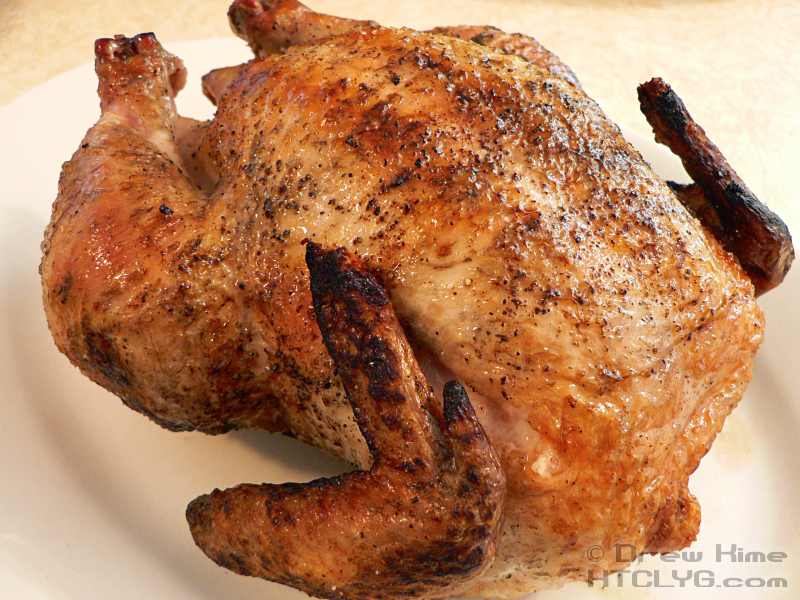
Since this bird was so small, I sliced the breasts off whole. Cut down along one side of the breastbone and follow the wishbone down the the thigh joint. Then cut along the bottom and remove the whole breast. (Hmm … I really should have taken pictures of that. It sounds more complicated than it really was.)

My wife decided to have it without the gravy. “I saw what it looked like before you made it.” Oh well. Her loss.

The girls and I had it with the gravy.

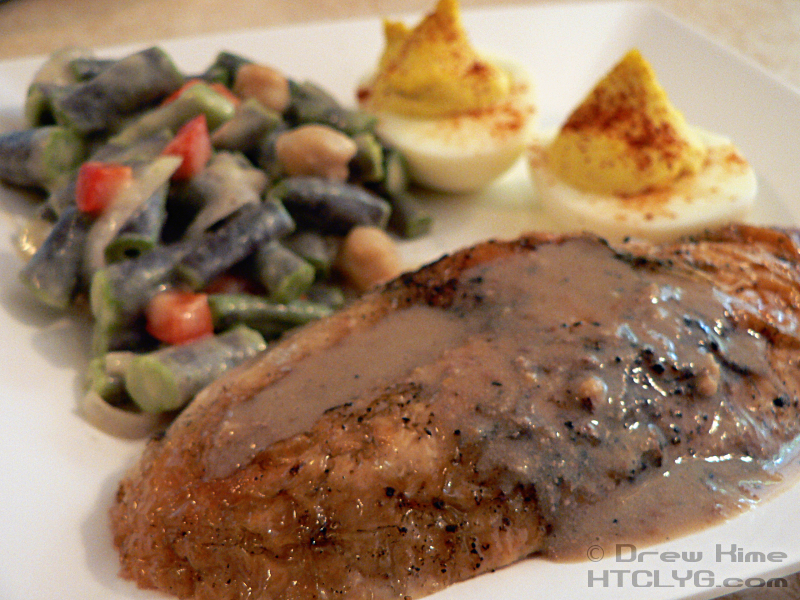
Oh, and the deviled eggs and the purple bean salad.

And that’s it.


I’m taking a little mini-vacation this weekend, so I’m not sure what I’ll be posting next week. I guess we’ll find out on Monday.


Want more like this? For more recipes like this, that you can hold right in your hands, and write on, take notes, tear pages out if you want (Gosh, you're tough on books, aren't you?) you might be interested in How To Cook Like Your Grandmother, 2nd edition, Illustrated. Or to learn your way around the kitchen, check out Starting From Scratch: The Owner's Manual for Your Kitchen.

This entry was posted in Dinner, Fowl and tagged , . Bookmark the permalink. Both comments and trackbacks are currently closed.

29 Comments

  1. [eatingclub] vancouver || js
    Posted July 24, 2008 at 10:56 pm | Permalink

    Oh the possibilities for rotisserie chicken! I love the new toy and I love the chicken it made.

  2. Trixie
    Posted July 24, 2008 at 11:03 pm | Permalink

    Slurp! That looks mighty good.

  3. Sweet Bird
    Posted July 26, 2008 at 12:54 am | Permalink

    Aww man. I’m totally jealous. My wimpy little hibachi could never attempt something like that.

  4. Ryan
    Posted July 26, 2008 at 2:50 pm | Permalink

    Come on – when is the PBJ sandwich recipe coming up!?

    By the way, the chicken looks good too.

  5. Nikki Miller-Ka
    Posted July 26, 2008 at 7:17 pm | Permalink

    Roast chicken is one of my 2 favorite foods. It’s the only thing I can truly say I love to eat.

  6. Genie
    Posted July 26, 2008 at 11:48 pm | Permalink

    THANKS! I use a Ronco rotisserie cooker for my birds–think I mentioned that before–and have been struggling a lot with trussing the wings. I love your technique! I Googled trussing plenty but never came across the technique of sewing the wingtips together like that, now I’ll never do it any other way. I hate trussing it by crisscrossing the twine from the legs and around the wings because I don’t want any more skin affected than absolutely necessary during roasting so had pretty much just given up on getting the wings to stay put during cooking. NEVER AGAIN! Woot!

    I recently learned to take a whole lemon or lime and slash it through the skin from tip to tip a four times so it stays whole but releases juice as it cooks, and stuff it in the bird. It adds nice flavor and terrific moisture. But, like you, I don’t like my bird adulterated too much. I’d like to try it with a small orange next.

    Your thermometer technique is genius, I’ll remember that if I ever get a grill and a rotisserie kit to go with it!

  7. Posted July 27, 2008 at 10:41 pm | Permalink

    Eatingclub, Trixie and Sweet Bird, it tasted as good as it looks. Don’t be jealous, find a friend with a grill.

    Ryan, maybe I’ll do that for my 200th.

    Nikki, you can’t say something like that and not tell us, what’s the other thing you love to eat?

    Genie, just make sure you don’t use cotton thread. I thought the melting fat would protect it, but no such luck. If you do it and it works, let us know what you used.

  8. jehan
    Posted July 28, 2008 at 3:04 pm | Permalink

    looks delicious! i usually pick one of these up at the grocery store every other week. this could be fun

  9. Posted July 28, 2008 at 4:51 pm | Permalink

    I just found out I’m going to my in-laws’ place tonight for dinner. My father-in-law is breaking in the rotisserie I just gave him for his birthday.

  10. Nate-n-Annie
    Posted July 31, 2008 at 2:36 pm | Permalink

    Your photos are awesome. I like the mod you did with the probe thermometer.

    Have you ever done beer can chicken? I wonder if there is a difference in the way it turns out compared to rotisserie.

  11. Posted July 31, 2008 at 2:50 pm | Permalink

    Beer can chicken is coming up in a couple of weeks. I’ll be doing it while on vacation. I’ll be testing the probe setup at least once more — on a pork loin — before the big day: Standing rib roast for Christmas Eve.

  12. ~Madeline~
    Posted July 31, 2008 at 3:48 pm | Permalink

    Oh my! Looks like you’re having a delicious time with your new toy. I envy you.

  13. Damaris
    Posted August 1, 2008 at 1:54 pm | Permalink

    woah that looks great. Thanks for all the details. To bad I don’t have all the gadgets.

  14. GirlCanBake
    Posted August 1, 2008 at 5:01 pm | Permalink

    I could be occupied for days with the possibilities of a rotisserie chicken. Thanks for the tutorial!

  15. Jen in Florida
    Posted April 16, 2009 at 2:07 pm | Permalink

    Hello, Thanks for the info, just bought a rotisserie for my grill. Made a great beef tenderloin with red zin gravy for easter. Chicken this weekend!

  16. Posted April 16, 2009 at 3:09 pm | Permalink

    Hey, thanks for commenting on this. I forgot it’s getting to be rotisserie season. Awesome.

  17. gordon from richmond va
    Posted April 20, 2009 at 6:19 pm | Permalink

    I like the keep it basic approach, self basting chicken is the best way to cook chicken, i found that you can actually keep the legs and wings tight with the prongs alone, also rub the cavity with your favorite seasoning and garlic.

  18. Posted April 20, 2009 at 10:16 pm | Permalink

    Looks like everyone’s starting to think about grilling season again. :-)

  19. Eamon in Texas
    Posted May 3, 2009 at 9:16 pm | Permalink

    Just wanted to drop you a line and say thanks for the simply and easy recipe. Broke in the rotisserie today on our new pit and the Chicken was Awesome. Checked out other sites but yours was simply and like yourself didn’t want to create this chore every time I use it.

  20. Posted May 3, 2009 at 10:26 pm | Permalink

    Eamon, you can always add more. But if it’s already this good, why bother?

  21. jeff
    Posted August 29, 2009 at 6:31 pm | Permalink

    I make a wet rub of tandoori masala and olive oil and rub the whole thing down,its unbelievable.
    also,i place a panful of water under the chicken to eliminate flareups and keep it humid.

  22. Steve - Columbus, Oh
    Posted October 21, 2009 at 1:54 pm | Permalink

    Two years ago I bought an electric oven to take camping. It had a rotisserie, but I was hesitant to use it. I didn't know how. Well, yesterday I got gutsy. It was the most delicious chicken I have ever had. I checked your site to see if I even came close to skewering it to the spit. I tied the wings and legs with regular twime, which I soaked in water first. Didn't burn. I did not use salt and pepper, but I was amazed how salty it still tasted. Maybe it was injected with some kind of brine. It cooked for 2 hrs at 350 degrees. Wonderful.

  23. Posted October 21, 2009 at 2:20 pm | Permalink

    Steve, congratulations. My first attempt with an electric rotisserie was … less than perfect.

  24. Kathy
    Posted August 8, 2010 at 1:39 pm | Permalink

    I tried your recipe for the chicken and it was fantastic! The pictures were very helpful because I wasn’t sure how to secure the bird onto the spit. I loved this soo much that I’m having it for Sunday dinner today.

    I made the mistake the first time of doing one of those fancy rubs and it overpowered the flavor of the bird and tasted like freshly mowed grass…..

    Keep up the great recipes and humor.

  25. Posted August 10, 2010 at 3:07 pm | Permalink

    Kathy, there are kits you can buy with elastic bands to make it easier to truss it up. It wasn’t worth the shipping charges when I found them online, so I’ve been looking for them whenever I’m out shopping.

  26. Amanda Khan
    Posted August 16, 2010 at 10:54 pm | Permalink

    thank you!! your post helped immensely i used my rotisserie for the first time and it came out great and was easy

  27. Mike Ferre
    Posted October 27, 2010 at 9:53 pm | Permalink

    Another trick……………
    A friend shared a trick with me to rotisserie chicken. Place a foil pan (drip pan) under the chicken to catch the drippings (elim a potential future fire) and pour 1/2 in. white wine with some herbs (we used basil and bay leaves). Let this steam the chicken. Used the limes in the cavity and rubbed chicken seasoning over the chicken before the spit. Then after 10 min cooking… basted once (oil and chicken seasoning). let it cook for 1.5 hrs (total) at 400 degrees or internal temp of 165 degrees. It was delicious.
    Mike

  28. Posted August 3, 2011 at 2:12 pm | Permalink

    Just found this site and also just received a rotisserie. I think I’ll try a little bit of all the posts…they all sound easy and delish. Let you all know how it turns out.

  29. Gary
    Posted December 14, 2012 at 3:14 pm | Permalink

    Just found your site. That chicken looks so good. Will try soon .i have many chickens since I raise my own.

Subscribe to comments on this post
  • Follow this blog

     Subscribe in a reader

    -- OR --
    To get recipes in your email
    Enter your email address:
    -- OR --
    Sign up for the weekly newsletter.Email address:
  • All-time Favorites

    Perfect Brownies
    Banana Cake
    French Onion Soup
    Egg Salad
    Onion Rings
    Bruschetta Pizza
    Peach Cobbler
    Cheesesteak
    Frozen Chocolate Truffle Pie
    Emily's Creamy Cheesecake


  • What Would Granny Cook?
  • No Secret Recipes
  • No Awards Please